शुक्रवार, 23 दिसंबर 2011

Connect Two Computers Using a Wi-Fi (Ad Hoc) Connection

This tutorial will show you how to connect two computers using a Wi-Fi connection. We will refer the two computers as PC 1 and PC 2. You will have to configure both the computers as given below:-

PC 1:

1. Right-click My Computer and select Properties.

2. Click on the Computer Name tab and then click on the Change button. Type the computer name to whatever you want, here we will name it PC 1 and you will also have to change the workgroup to WG. (The workgroup name should be the same in both the computers) Now click Apply and close it.

3. Goto Network Connections and right-click on your wireless adapter and select Properties. Now goto the Wireless Network Tab and click on the Advanced button. Select Computer to Computer (Ad hoc) networking option. If you get a window with an SSID box, you can specify the network name in it, in our example we will use Wi-Fi as the SSID. Now close the window and click on Add Preferred Networks.

Enter the settings as follows:

Network name (SSID) : Wi-Fi
Network Authentication : Open
Data Encryption : Disabled

4. Tick the “This is a computer-to-computer (ad hoc) network, wireless access points are not used” option if it isn’t already ticked. To automatically connect to the network, goto the Connection tab and tick on the Connect automatically when in range option. Now, to configure the TCP/IP connection settings, goto the General tab and select Internet Protocol (TCP/IP) and click the Properties button. Set the Values as:-

IP Address - 192.168.0.1
Subnet Mask - 255.255.255.0
Default Gateway - 192.168.0.2


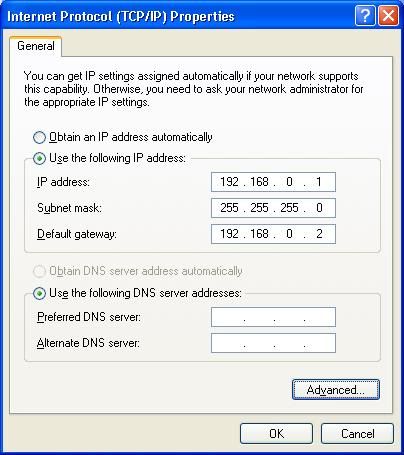
5. Click OK and you have finished the steps for PC 1.

PC 2:

1. Right-click My Computer and click Properties.

2. Click on the Computer Name tab and then click on the Change button. Type the computer name to whatever you want, here we will name it PC 2 and you will also have to change the workgroup to WG. (The workgroup name should be the same in both the computers) Now click Apply and close it.

3. Goto Network Connections and right-click on your wireless adapter and select Properties. Now goto the Wireless Network Tab and click on the Advanced button. Select Computer to Computer (Ad hoc) networking option. If you get a window with an SSID box, you can specify the network name in it, in our example we will use Wi-Fi as the SSID. Now close the window and click on Add Preferred Networks.

Enter the settings as follows:

Network name (SSID) : Wi-Fi
Network Authentication : Open
Data Encryption : Disabled

4. Tick the “This is a computer-to-computer (ad hoc) network, wireless access points are not used” option if it isn’t already ticked. To automatically connect to the network, goto the Connection tab and tick on the Connect automatically when in range option. Now, to configure the TCP/IP connection settings, goto the General tab and select Internet Protocol (TCP/IP) and click the Properties button. Set the Values as:-

IP Address - 192.168.0.2
Subnet Mask - 255.255.255.0
Default Gateway - 192.168.0.1


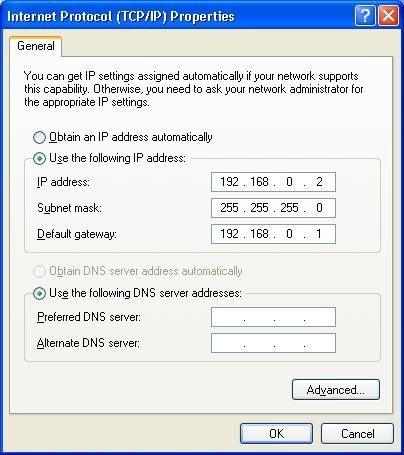
5. Click OK and you have finished the steps for PC 2.

Now open the Wireless network settings and click on View Available Wireless Networks. Select your network and you are connected.

Note : The settings mentioned may vary in case of different adapters. But most of them should be similar to the above settings.

गुरुवार, 3 नवंबर 2011

वाह क्‍या साईट है

विंडोज एक्‍स पी के ट्रबलशुटिंग के लिए एक जबरदस्‍त साईट है जहां उसके हर बिमारी का ईलाज है

शनिवार, 8 अक्तूबर 2011

वेबसाइट कैसे बनाये


इंटरनेट के विकास से दुनिया में नई सुचना क्रांति की शुरुवात हो गई है. वेबसाइटआज हमारी जिंदिगी का अभिनं अंग बन गया है।
अपनी एक वेबसाइट की जरुरत आजकल सबको लगती हैलेकिन इसके विकास कीप्रक्रिया क़ी जानकरी ना होना हमें डरता है। तकनीकी विकास के कारण वेबसाइटबनाने में पैसा भी अब बहुत कम लगता है।
वेबसाइट बनाने में पाच चरण मुख्य हैं:
  1. नाम पंजीकृत करना (Domain Name Registration)
  2. जगह लेना (Website Hosting)
  3. वेबसाइट या पपने बनाना (Website Development)
  4. वेबसाइट का प्रचार (Website Promotion)
  5. वेबसाइट का रख-रखाव (Website Maintenance)
नाम पंजीकृत करना (Domain Name Registration)
नाम पंजीकृत कराना इसका पहला स्तर है. ये वो नाम है जिससे आपकी वेबसाइट जानी जायगी और लोग इसको एड्रेस बार मैं टाइप करके खोलेंगे.
वेबसाइट नाम के मुख्य प्रकार:
.com: ये व्यावसायिक वेबसाइट के लिए इस्तमाल होता है. उदहारण के लिएgoogle.com, yahoo.com, facebook.com इत्यादि
.org: ये लाभ-निरपेक्ष वेबसाइट के लिए इस्तमाल होता है. दूसरे शब्दों में वो संस्था जिसका मक्सद मुनाफा नहीं है. उदहारण के लिए ट्रस्ट, सोसाइटी,इत्यादि
.coसहकारिता (Cooperationवेबसाइट के लिए इस्तेमाल होता है.
.bizये व्यापारिक संस्थान की वेबसाइट के लिए इस्तमाल होता है.
.inदेश के लिए खास नाम एक नयी कणी है. .in भारत के लिए इस्तेमाल होता है. इसको आप .com, .org या िकसी और नाम के साथ भी जोड़ सकते है. उदहारण के लिए .co.in, .org.in इत्यादि
.com और .org सबसे जयादा इस्तेमाल होते है.
आपके पसंद के नाम को खोजने में http://iwantmyname.com/ याhttps://domize.com/ आपकी मदद करेगी.
वेबसाइट का नाम पंजीकृत करने की कीमत ३०० से शुरू हो जाती है. येशुल्क हर साल देना होता है. मैं ये ही सलाह दूँगा की आप एक साथ एक सेअधिक वर्षो के लिए पंजीकृत करा ले.

जगह लेना (Website Hosting)
ये वैसे ही है जैसे दफ्तर के लिए जगह किराये पर लेना. आपको अपनी वेबसाइट के पंनो के लिए डाटा सेंटर के कंप्यूटर में जगह लेनी होती है. अपनी जरुरत के मुतािबक आप िजतनी जगह चाहे ले सकते है १० mbया 2 GB और अगर आपकी वेबसाइट बहुत बड़ी है तो आप एक पूरा कंप्यूटर ही किराये पर ले सकते है (Dedicated Hosting)
होस्टिंग दो तरीके की होती है  विंडोस (Windows) या लिनुक्स (Linux). साधारण वेबसाइट में इसका कोई खास फर्क नहीं पड़ता लेिकन बड़ी या जटील वेबसाइट के लिया जगह लेते वक्त इसका बहुत धयान रखना पड़ता है.
नाम पंजीकृत करने और जगह लेने के लिए बहुत कंपनीया है. इनमे से कुछ मुख्य ये है:
नेट४इडिंया (Net4India): http://www.net4.in
स्पेक्ट्रानेट (Spectranet): http://www.spectranet.in
रीडिफ़ (Rediff): hosting.rediff.com
पुग्मर्क्स (Pugmarks): http://www.pugmarks.in/

वेबसाइट या पपने बनाना (Website Development)
तकनी विकास से वेबसाइट बनाना अब बहुत सरल हो गया है. सॉफ्टवेर जैसे की द्रेंवेअवर (Dreamweaver) या फ्रंटपेज (Frontpage) के इस्तमाल से आप अपनी पहली वेबसाइट कूद बना सकते है. इन्टरनेट पर इसके बारे में बहुत कुछ दिया गया है जो आपको मदद करेगा.
इस काम के लिए आप कीसी कंपनी से भी मदद ले सकते है. भारत में वेबसाइट बनाने वाली बहुत सारी कंपनिया है. मैं आपको सलाह दूँगा कि उस कंपनी को काम दे जो आपके पास मे हो.
वेबसाइट का प्रचार (Website Promotion)
आपकी वेबसाइट बनाने की मेहनत और पैसा तभी सफल होगी जब उसको लोग देखंगे. वेबसाइट का प्रचार करने के दो मुख्य प्रकार है  इन्टरनेट के द्वारा (online) तथा पारंपरिक तरीकों से (offline)
इन्टरनेट के द्वारा वेबसाइट का प्रचार (Online Website Promotion)
इन्टरनेट पर सर्च इंजन (जैसे की गूगल, बिंग, याहू) प्रचार का सबसे बड़े माध्यम है. ८०% लोग अपने उपयोग की वेबसाइट सर्च इंजन के द्वारा ढूढते है. वैसे तो आज कल सर्च एनगिने इतने बुद्धिमान हो गए है की वो आपकी वेबसाइट को स्वयं ही तलाश कर लेंगे पर इसमें समय लग सकता है. इसलिए ये ठीक रहगा की आप अपनी वेबसाइट को खुद ही पंजीकृत कर दे. सभी मुख्य सर्च इंजन का पंजीकरन पाना होता है.
गूगल: https://www.google.com/webmasters/tools/home?hl=en
याहू: http://siteexplorer.search.yahoo.com/
बिंग: http://www.bing.com/toolbox/webmasters/
ये दर्ज कराना मुफ्त में होता है.
आप अपनी वेबसाइट की जानकारी फोरम, ऑरकुट, फेसबूक, ट्विट्टर, ऑरकुट इत्यादी में भी दे सकते है.
पारंपरिक तरीको के द्वारा वेबसाइट का प्रचार (Promote Website Offline)
परचार का मकसद यही है की आपकी वेबसाइट की जानकारी अिधक से अिधक लोगो तक पहुचे, इसलिय जहाँ भी हो सके अपनी वेबसाइट का नाम लीखे, जैसे की - नाम-पत्रकविवरण पुस्तिकापुस्तिकापत्रविज्ञापनपोस्टरइत्यादि
वेबसाइट के दर्शको की जानकारी
वेबसाइट में आने वाले दर्शको की जानकारी रखना बहुत जरुरी है. इसके लिए बहुत सारी प्रणाली मोजुद है. गूगल का एनालिटिसच्स (Google Analytics) इनमे से एक है और बहुत आधुनिक और उपयोगी है. ये सुविधा पूरी तरह से मुफत है. इसके द्वारा आप अपनी वेबसाइट में आने वालेदर्शको की संख्या, रहने का स्थान (देश, राज्य), आने का माध्यम इत्यादी जान सकते है.
वेबसाइट का रख-रखाव (Website Maintenance)
ये जरुरी है की आपकी वेबसाइट में नवीनतम और सही अंतर्वस्तु अंश हो. गलत, अधूरे या पुराना अंतर्वस्तु अंश आपकी या आपकी संस्था की साख को भी खराब करता है. ये धयान रखे की वेबसाइट पर कोई लिंक (link) टुटा हुआ ना हो.
अपना दर्शको की प्रवृत्ति को लगातार देखे तथा उसके अनुसार अपनी वेबसाइट में परिवर्तन करे
अपने वेबसाइट की क्नोलोजी को भी बदलते रहे और नए तकनीको को अपनी वेबसाइट में डालते रहे.


सौजन्‍य से 


http://nirkot.blogspot.com/2010/10/blog-post.html

2. http://networkedblogs.com/9KVvQ

टीप Original source : 1. 

Open School ke Result ke liye website

बुधवार, 28 सितंबर 2011

12 A कार्टैज की बिमारी का ईलाज

कार्टेज अगर काली पटिटयां छोडे निश्चित अंतराल पर तो उसका pcr बदलें

कागज काला आ रहा हो तो cleaning blade बदलें

शनिवार, 10 सितंबर 2011

Fix Corrupt Files In Windows XP and Windows 7

Hello friends, these tips is for all those who have windows XP and windows 7 and those wants to fix their corrupted files in windows XP and in windows 7. My computer also had been suffered from this kind of problem and I maintained it through the help of following tips. Well this is a good and full proof way to fix corrupt file.

Process:

In Windows XP

1. At first you need have a XP CD to solve this problem.

2. Now, place or put that CD in your CD or DVD drive.

3. Go to Start button.

4. Go to Run

5. And in the Run command type “SFC / SCANNOW“.

6. This process should fix your corrupt.

7. Now, boot from your windows XP CD, then ignore the first repair option you get by pressing the R and when it shows you windows XP is already installed then you will see Repair option, select it and just start and repair it. it won’t affect any of installed software from your system.

Note: You could also attempt a defragment of your hard drive, as fragmentations of files can sometimes produce errors.

In windows 7

This tricks is as same as a process of windows XP. Here it is.

1. At first, go and turn on your system means your computer.

2. Then before open your windows, login as Administrator.

3. Click start and go to All programs.

4. Go to Accessories.

5. After that right click on command prompt and select “Run as Administrator“.

6. Now, just type “SFC/SCANNOW” in the command prompt and hit or press the enter button.

7. Now, it will take several minutes to scan for damaged systems files and verifies its integrity

8. Don’t panic. Wait till the process of scanning is 100% or fully complete.

9. After the process finished, close out the command prompt window and reboot your system.

Note: Both process are seems same, but there is some different uses of command so, be careful while doing it and use the command correctly.


गुरुवार, 1 सितंबर 2011

Re-install Windows by Formatting Computer Without Losing Data

Method 1 : Using the Files and Settings Transfer Wizard

A procedure to create a full backup of your important data before performing a full format of your computer is by using the “Files and Settings Transfer” (FAST) wizard of your Windows operating system. To execute this procedure follow the steps below :

1. Click “Start” and navigate to All Programs> Accessories> System Tools> Files and Settings Transfer Wizard.

2. The wizard opens. Continue by clicking on “Next”.

3. You will be asked if the computer you are using is the “New Computer” or “Old Computer”.Select “Old Computer” and then proceed with clicking on “Next”.

4. The “Select Transfer Method” window appears. Select the option “Other (for example, removable drive or network drive)”. Browse to select a drive where you want to store your important documents in the box below. Make sure to select a drive that has enough space to store the data to be safely kept, i.e., data you don’t wish to get deleted. Click “Next” to continue with the data transfer process.

The transferring or copying process starts. This process takes some time to complete. The estimated time depends upon the total size of the files being transferred and the speed of your system.

After the files are copied and the transfer process ends, exit the “Files and Settings Transfer Wizard”. Your computer is now ready to be entirely formatted.

Now, insert the Windows installation CD or DVD and reboot your computer. Perform a normal installation of your Windows operating system by entirely formatting your computer, i.e, clearing your complete hard drives of their contents (if you saves the backup to a removable disk, otherwise format only the installation drive) .

After Windows is completely installed, and the system restarts with a fresh new copy of Windows, you need to recover the files and documents that you have previously saved in order to prevent them from being deleted. To recover those files, follow the steps described below :

  • Click on Start > All Programs> Accessories> System Tools> Files and Settings Transfer Wizard.
  • The “FAST” wizard opens up. Continue by clicking on “Next”.
  • You are given three options : To create a wizard disk in ; To use an existing wizard disk ; That you don’t need a wizard disk, since you have already stored the files to be recovered in another location. Select the 3rd option as you have previously stored the files to “Old Computer”. Then click on “Next” to proceed to the next step.

  • The “Select a Transfer Method” box appears and like in the previous scenario, select the option “Other (for example, removable drive or network drive)” as you have to recover the saved files from the location you have stored them in. Specify the drive location where you have previously saved your documents by clicking on“Browse”. Continue the recovery process with “Next”.

The files starts to be recovered as the transfer process commences. These files, that you had previously stored, are transferred from the “Old Computer” to the “New Computer”. You can now access this data normally as you did in the previous versions.

[Tip : Install all programs that are required before recovering the files using the "FAST" wizard, so that the recovered files work in order after you recover them.]

Method 2 : Using Repair Option During Installation

With your computer turned on, insert the Windows installation CD/DVD and then reboot your system. When your computer restarts, follow the instructions to boot from the CD or DVD. The Windows Setup wizard starts and Windows checks the hardware configuration of your computer for the installation process.

When the “Welcome to Setup” screen appears, press ENTER to select the option “To set up Windows now”. Make sure to not press “R” as this selects the “Recovery Console” option.

When the next screen appears, press F8 to accept the license agreement for Microsoft Software and continue.

The installation wizard searches for any previous versions of Windows located in your computer and of course it will find one, since you still have the Windows operating system in your computer. You will be optioned to either repair the selected copy of Windows that appears on your screen by pressing “R”, or to install a fresh copy of Windows by pressing“ESC”.

Press “R” to select the option to repair your existing Windows operating system. Windows starts copying files to your computer hard drive.

Once the copying process is complete, you will be asked to restart your system on which abide to the request. On restarting, continue the process of installation just like you would in case of a normal one. After the total installation process is complete, you can access all your previous data along with all previously installed programs in a fresh copy of Windows.

You have formatted your computer, installed a new fresh copy Windows, removed all anomalies that were causing you problems previously, and you haven’t lost any data along with being enabled to access all of your previously installed programs. Surely, these two procedures to format your computer without losing your important and classified data are gonna be of help to you.


http://www.techtipsgeek.com/re-install-windows-by-formatting-computer-without-losing-data/4710/

SOURCE :

Partitioning Hard Drive in Windows 7 Without Formatting

Guidelines and procedure for the entire operation to be carried out successfully

  • First of all go to “ Start ” and then on the window that appears search for ” Computer ” and then once you right click on it another window opens and then you should navigate to the option “ Manage “.

  • At once a new window will open entitled “Computer Management“. In this new window click on “ Storage ” and then go to “ Disk Management “.

  • The completion of the second step will give you a view of all the drives present in your computer.

  • Among these select the one you want to partition. Then right click on the selected drive and navigate to the option ” Shrink Volume.. “.

  • A new window should open in which the size of the drive before shrink will be mentioned and the available space to shrink will be mentioned , and in the next line you will be asked to enter the amount of space you want to shrink and this will be the size of the new partition.

Caution : The space you enter must be within the limit of the available space displayed above.


  • After entering the values click on the option “ Shrink ” and wait for the process to complete. The time taken for the operation may be long depending upon the size of the disk and the space to be shrunk. Once the operation is completed a window appears showing unallocated space and the value is exactly the one you entered earlier. Select this unallocated space and on right clicking on it click on the option “ New Simple Volume “.

  • A wizard will open up. Go through the wizard and fill in the values required. Usually the value needed to enter is the same one that you entered as the volume to be shrunk.
  • The drive newly created needs a letter to be assigned to it. Assign any letter of your choice as it does not make any difference.
  • A Format page will appear and in it carefully notice that the File System selected is “ NTFS ” . After this is done enter a name for your drive and then click on ” Next ” and then “ Finish “.

You have reached your goal. You have partitioned your Hard Drive in Windows 7 without formatting your computer and without the use of any software. Feel free to drop your comments in the comment box.