शुक्रवार, 23 दिसंबर 2011

Connect Two Computers Using a Wi-Fi (Ad Hoc) Connection

This tutorial will show you how to connect two computers using a Wi-Fi connection. We will refer the two computers as PC 1 and PC 2. You will have to configure both the computers as given below:-

PC 1:

1. Right-click My Computer and select Properties.

2. Click on the Computer Name tab and then click on the Change button. Type the computer name to whatever you want, here we will name it PC 1 and you will also have to change the workgroup to WG. (The workgroup name should be the same in both the computers) Now click Apply and close it.

3. Goto Network Connections and right-click on your wireless adapter and select Properties. Now goto the Wireless Network Tab and click on the Advanced button. Select Computer to Computer (Ad hoc) networking option. If you get a window with an SSID box, you can specify the network name in it, in our example we will use Wi-Fi as the SSID. Now close the window and click on Add Preferred Networks.

Enter the settings as follows:

Network name (SSID) : Wi-Fi
Network Authentication : Open
Data Encryption : Disabled

4. Tick the “This is a computer-to-computer (ad hoc) network, wireless access points are not used” option if it isn’t already ticked. To automatically connect to the network, goto the Connection tab and tick on the Connect automatically when in range option. Now, to configure the TCP/IP connection settings, goto the General tab and select Internet Protocol (TCP/IP) and click the Properties button. Set the Values as:-

IP Address - 192.168.0.1
Subnet Mask - 255.255.255.0
Default Gateway - 192.168.0.2
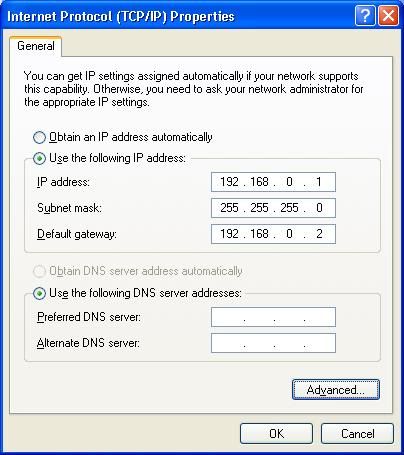


5. Click OK and you have finished the steps for PC 1.

PC 2:

1. Right-click My Computer and click Properties.

2. Click on the Computer Name tab and then click on the Change button. Type the computer name to whatever you want, here we will name it PC 2 and you will also have to change the workgroup to WG. (The workgroup name should be the same in both the computers) Now click Apply and close it.

3. Goto Network Connections and right-click on your wireless adapter and select Properties. Now goto the Wireless Network Tab and click on the Advanced button. Select Computer to Computer (Ad hoc) networking option. If you get a window with an SSID box, you can specify the network name in it, in our example we will use Wi-Fi as the SSID. Now close the window and click on Add Preferred Networks.

Enter the settings as follows:

Network name (SSID) : Wi-Fi
Network Authentication : Open
Data Encryption : Disabled

4. Tick the “This is a computer-to-computer (ad hoc) network, wireless access points are not used” option if it isn’t already ticked. To automatically connect to the network, goto the Connection tab and tick on the Connect automatically when in range option. Now, to configure the TCP/IP connection settings, goto the General tab and select Internet Protocol (TCP/IP) and click the Properties button. Set the Values as:-

IP Address - 192.168.0.2
Subnet Mask - 255.255.255.0
Default Gateway - 192.168.0.1
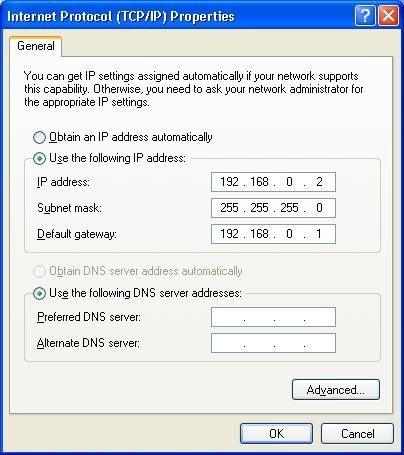


5. Click OK and you have finished the steps for PC 2.

Now open the Wireless network settings and click on View Available Wireless Networks. Select your network and you are connected.

Note : The settings mentioned may vary in case of different adapters. But most of them should be similar to the above settings.

गुरुवार, 3 नवंबर 2011

वाह क्‍या साईट है

विंडोज एक्‍स पी के ट्रबलशुटिंग के लिए एक जबरदस्‍त साईट है जहां उसके हर बिमारी का ईलाज है

शनिवार, 8 अक्टूबर 2011

वेबसाइट कैसे बनाये


इंटरनेट के विकास से दुनिया में नई सुचना क्रांति की शुरुवात हो गई है. वेबसाइटआज हमारी जिंदिगी का अभिनं अंग बन गया है।
अपनी एक वेबसाइट की जरुरत आजकल सबको लगती हैलेकिन इसके विकास कीप्रक्रिया क़ी जानकरी ना होना हमें डरता है। तकनीकी विकास के कारण वेबसाइटबनाने में पैसा भी अब बहुत कम लगता है।
वेबसाइट बनाने में पाच चरण मुख्य हैं:
  1. नाम पंजीकृत करना (Domain Name Registration)
  2. जगह लेना (Website Hosting)
  3. वेबसाइट या पपने बनाना (Website Development)
  4. वेबसाइट का प्रचार (Website Promotion)
  5. वेबसाइट का रख-रखाव (Website Maintenance)
नाम पंजीकृत करना (Domain Name Registration)
नाम पंजीकृत कराना इसका पहला स्तर है. ये वो नाम है जिससे आपकी वेबसाइट जानी जायगी और लोग इसको एड्रेस बार मैं टाइप करके खोलेंगे.
वेबसाइट नाम के मुख्य प्रकार:
.com: ये व्यावसायिक वेबसाइट के लिए इस्तमाल होता है. उदहारण के लिएgoogle.com, yahoo.com, facebook.com इत्यादि
.org: ये लाभ-निरपेक्ष वेबसाइट के लिए इस्तमाल होता है. दूसरे शब्दों में वो संस्था जिसका मक्सद मुनाफा नहीं है. उदहारण के लिए ट्रस्ट, सोसाइटी,इत्यादि
.coसहकारिता (Cooperationवेबसाइट के लिए इस्तेमाल होता है.
.bizये व्यापारिक संस्थान की वेबसाइट के लिए इस्तमाल होता है.
.inदेश के लिए खास नाम एक नयी कणी है. .in भारत के लिए इस्तेमाल होता है. इसको आप .com, .org या िकसी और नाम के साथ भी जोड़ सकते है. उदहारण के लिए .co.in, .org.in इत्यादि
.com और .org सबसे जयादा इस्तेमाल होते है.
आपके पसंद के नाम को खोजने में http://iwantmyname.com/ याhttps://domize.com/ आपकी मदद करेगी.
वेबसाइट का नाम पंजीकृत करने की कीमत ३०० से शुरू हो जाती है. येशुल्क हर साल देना होता है. मैं ये ही सलाह दूँगा की आप एक साथ एक सेअधिक वर्षो के लिए पंजीकृत करा ले.

जगह लेना (Website Hosting)
ये वैसे ही है जैसे दफ्तर के लिए जगह किराये पर लेना. आपको अपनी वेबसाइट के पंनो के लिए डाटा सेंटर के कंप्यूटर में जगह लेनी होती है. अपनी जरुरत के मुतािबक आप िजतनी जगह चाहे ले सकते है १० mbया 2 GB और अगर आपकी वेबसाइट बहुत बड़ी है तो आप एक पूरा कंप्यूटर ही किराये पर ले सकते है (Dedicated Hosting)
होस्टिंग दो तरीके की होती है  विंडोस (Windows) या लिनुक्स (Linux). साधारण वेबसाइट में इसका कोई खास फर्क नहीं पड़ता लेिकन बड़ी या जटील वेबसाइट के लिया जगह लेते वक्त इसका बहुत धयान रखना पड़ता है.
नाम पंजीकृत करने और जगह लेने के लिए बहुत कंपनीया है. इनमे से कुछ मुख्य ये है:
नेट४इडिंया (Net4India): http://www.net4.in
स्पेक्ट्रानेट (Spectranet): http://www.spectranet.in
रीडिफ़ (Rediff): hosting.rediff.com
पुग्मर्क्स (Pugmarks): http://www.pugmarks.in/

वेबसाइट या पपने बनाना (Website Development)
तकनी विकास से वेबसाइट बनाना अब बहुत सरल हो गया है. सॉफ्टवेर जैसे की द्रेंवेअवर (Dreamweaver) या फ्रंटपेज (Frontpage) के इस्तमाल से आप अपनी पहली वेबसाइट कूद बना सकते है. इन्टरनेट पर इसके बारे में बहुत कुछ दिया गया है जो आपको मदद करेगा.
इस काम के लिए आप कीसी कंपनी से भी मदद ले सकते है. भारत में वेबसाइट बनाने वाली बहुत सारी कंपनिया है. मैं आपको सलाह दूँगा कि उस कंपनी को काम दे जो आपके पास मे हो.
वेबसाइट का प्रचार (Website Promotion)
आपकी वेबसाइट बनाने की मेहनत और पैसा तभी सफल होगी जब उसको लोग देखंगे. वेबसाइट का प्रचार करने के दो मुख्य प्रकार है  इन्टरनेट के द्वारा (online) तथा पारंपरिक तरीकों से (offline)
इन्टरनेट के द्वारा वेबसाइट का प्रचार (Online Website Promotion)
इन्टरनेट पर सर्च इंजन (जैसे की गूगल, बिंग, याहू) प्रचार का सबसे बड़े माध्यम है. ८०% लोग अपने उपयोग की वेबसाइट सर्च इंजन के द्वारा ढूढते है. वैसे तो आज कल सर्च एनगिने इतने बुद्धिमान हो गए है की वो आपकी वेबसाइट को स्वयं ही तलाश कर लेंगे पर इसमें समय लग सकता है. इसलिए ये ठीक रहगा की आप अपनी वेबसाइट को खुद ही पंजीकृत कर दे. सभी मुख्य सर्च इंजन का पंजीकरन पाना होता है.
गूगल: https://www.google.com/webmasters/tools/home?hl=en
याहू: http://siteexplorer.search.yahoo.com/
बिंग: http://www.bing.com/toolbox/webmasters/
ये दर्ज कराना मुफ्त में होता है.
आप अपनी वेबसाइट की जानकारी फोरम, ऑरकुट, फेसबूक, ट्विट्टर, ऑरकुट इत्यादी में भी दे सकते है.
पारंपरिक तरीको के द्वारा वेबसाइट का प्रचार (Promote Website Offline)
परचार का मकसद यही है की आपकी वेबसाइट की जानकारी अिधक से अिधक लोगो तक पहुचे, इसलिय जहाँ भी हो सके अपनी वेबसाइट का नाम लीखे, जैसे की - नाम-पत्रकविवरण पुस्तिकापुस्तिकापत्रविज्ञापनपोस्टरइत्यादि
वेबसाइट के दर्शको की जानकारी
वेबसाइट में आने वाले दर्शको की जानकारी रखना बहुत जरुरी है. इसके लिए बहुत सारी प्रणाली मोजुद है. गूगल का एनालिटिसच्स (Google Analytics) इनमे से एक है और बहुत आधुनिक और उपयोगी है. ये सुविधा पूरी तरह से मुफत है. इसके द्वारा आप अपनी वेबसाइट में आने वालेदर्शको की संख्या, रहने का स्थान (देश, राज्य), आने का माध्यम इत्यादी जान सकते है.
वेबसाइट का रख-रखाव (Website Maintenance)
ये जरुरी है की आपकी वेबसाइट में नवीनतम और सही अंतर्वस्तु अंश हो. गलत, अधूरे या पुराना अंतर्वस्तु अंश आपकी या आपकी संस्था की साख को भी खराब करता है. ये धयान रखे की वेबसाइट पर कोई लिंक (link) टुटा हुआ ना हो.
अपना दर्शको की प्रवृत्ति को लगातार देखे तथा उसके अनुसार अपनी वेबसाइट में परिवर्तन करे
अपने वेबसाइट की क्नोलोजी को भी बदलते रहे और नए तकनीको को अपनी वेबसाइट में डालते रहे.


सौजन्‍य से 


http://nirkot.blogspot.com/2010/10/blog-post.html

2. http://networkedblogs.com/9KVvQ

टीप Original source : 1. 

Open School ke Result ke liye website